Creating a custom form in Drupal 8/9

Intro
The purpose of this blog post is to utilise some of the points covered in the last tutorial, to make a page that shows a custom form, equally we can place this custom form in a custom block, which we will look at a bit later on in this tutorial. As mentioned in our last tutorial, we can also output the form using a custom twig template file if we need to change the html markup in anyway, but I'm not going to add that into this tutorial, as I have covered similar ideas in a previous tutorial/ blog post.
For this tutorial, I do assume that you have some knowledge of object oriented and procedural programming in PHP.
The info.yml file
The [module name].info.yml is pretty much the same as ones that we have generated previously in other tutorials. The contents of the info.yml that we are using is below:
name: 'Custom form'
type: module
description: 'My Awesome Module'
core_version_requirement: ^8 || ^9
package: 'Custom'
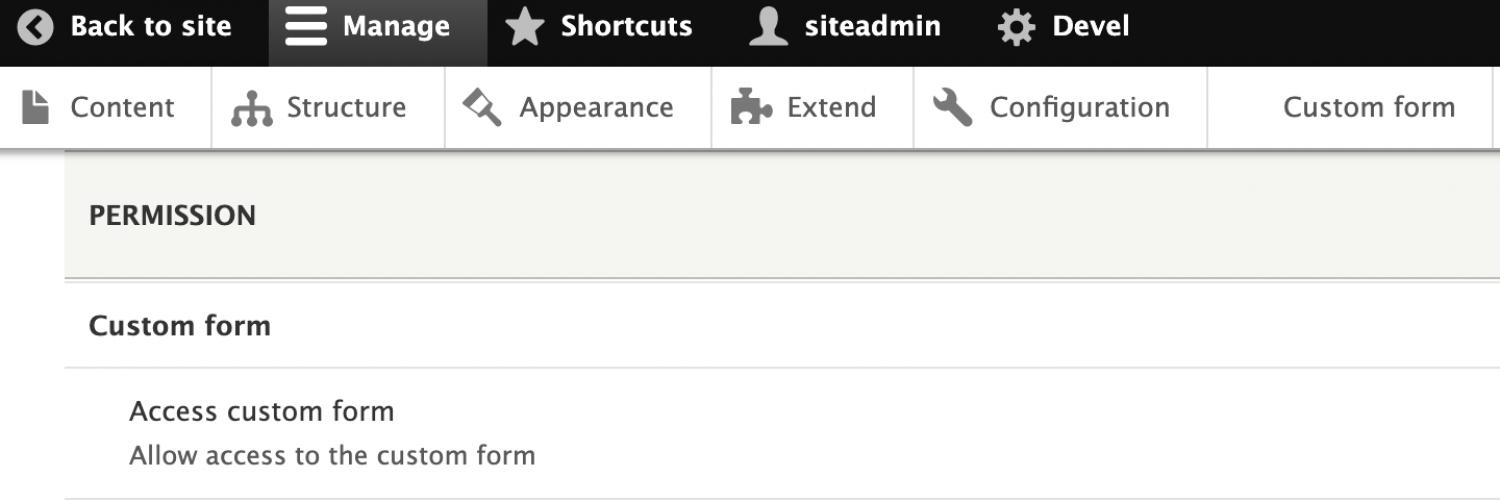
Permissions
Depending on whether you want your form to viewed by all or restricted, you may want to add a [module name].permissions.yml file to your module that contains some yaml code that may look similar to the below, we covered the permissions.yml file in a slightly more detailed fashion in an earlier tutorial.
The permissions yaml code that we are using for this tutorial is below;
access custom form:
  title: 'Access custom form'
  description: 'Allow access to the custom form'
You should now see your new permission (providing you have enabled the module of course) on the permission page in Drupal.
.module file
The .module file contents is similar to the ones shown in our previous blog posts, as this is a fairly simple blog post, we're not going to add anything more than the below code to the .module file, in reality, we could just omit the file until we need it.
<?php

/**
 * @file
 * Contains custom_form.module.
 */

use Drupal\Core\Routing\RouteMatchInterface;

/**
 * Implements hook_help().
 */
function custom_form_help($route_name, RouteMatchInterface $route_match) {
  switch ($route_name) {
    // Main module help for the custom_form module.
    case 'help.page.custom_form':
      $output = '';
      $output .= '<h3>' . t('About') . '</h3>';
      $output .= '<p>' . t('My Awesome Module') . '</p>';
      return $output;

    default:
  }
}
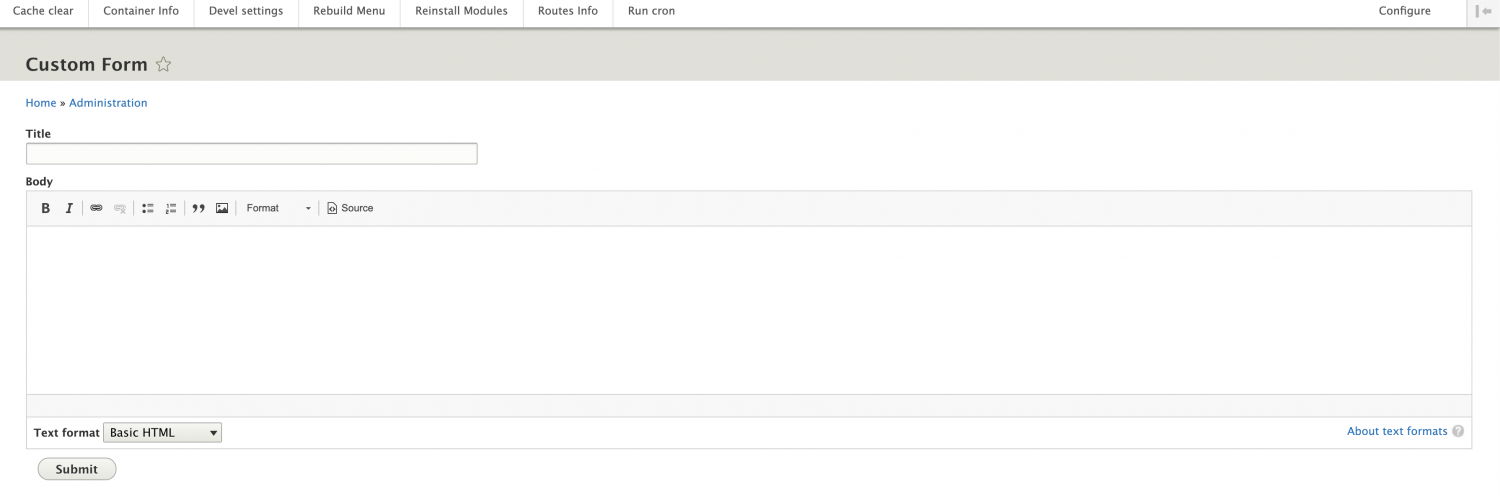
Form class
Create a php file inside your modules src/Form directory called CustomForm.php and you can add the following code, which is a class that extends Drupals Form Class, to create our own form.
In our form class, we need to provide a form id using a public function called getFormId() followed by 3 form related functions, although one of them is optional, these functions are; buildForm, validateForm and submitForm.
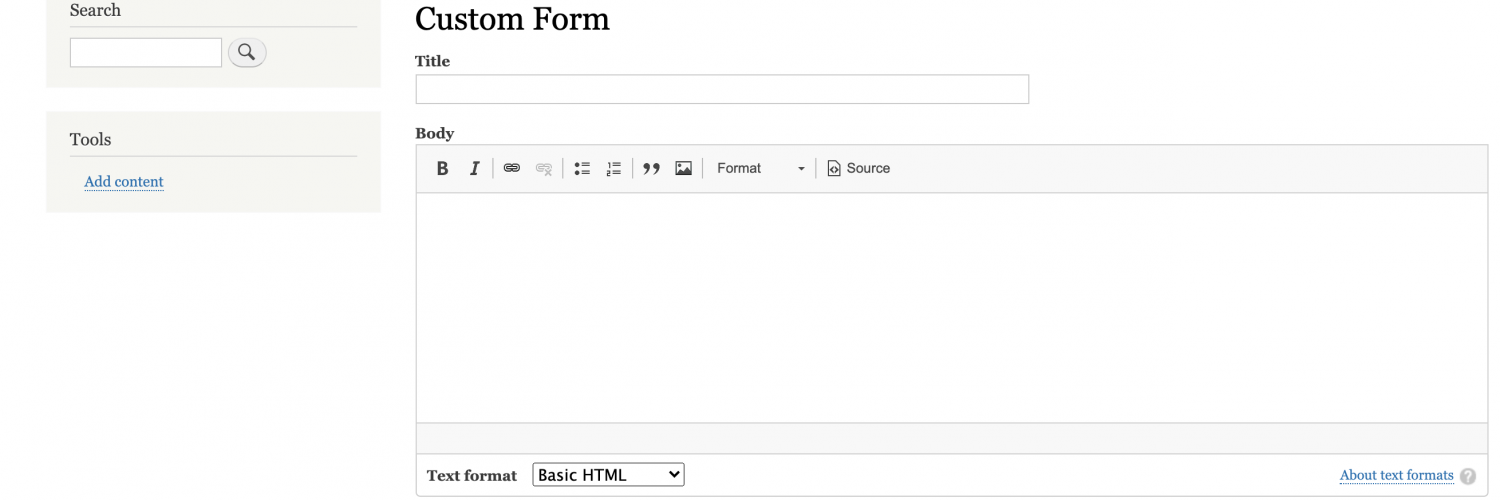
The build form function will contain code that uses Drupal's Form API to add fields to our custom form.
The validate form function can be used to validate the data that is being input into the fields on the form, so that we can point our any human error/ guide the user to enter the data into the fields in the format that we want, this is the option function, as sometimes, we may not want to validate the input for a form, although generally you should validate the input for security reasons.
Finally the submit function can be used to handle the entered form data when the forms submit button is clicked.
Below is the code that I have for my CustomForm class created for this blog post.
<?php

namespace Drupal\custom_form\Form;

use Drupal\Core\Form\FormBase;
use Drupal\Core\Form\FormStateInterface;

/**
 * Class CustomForm.
 */
class CustomForm extends FormBase {

  /**
   * {@inheritdoc}
   */
  public function getFormId() {
    return 'custom_form';
  }

  /**
   * {@inheritdoc}
   */
  public function buildForm(array $form, FormStateInterface $form_state) {
    $form['title'] = [
      '#type' => 'textfield',
      '#title' => $this->t('Title'),
      '#maxlength' => 64,
      '#size' => 64,
      '#weight' => '0',
    ];
    $form['body'] = [
      '#type' => 'text_format',
      '#title' => $this->t('Body'),
      '#weight' => '0',
    ];
    $form['submit'] = [
      '#type' => 'submit',
      '#value' => $this->t('Submit'),
    ];

    return $form;
  }

  /**
   * {@inheritdoc}
   */
  public function validateForm(array &$form, FormStateInterface $form_state) {
    foreach ($form_state->getValues() as $key => $value) {
      // @TODO: Validate fields.
    }
    parent::validateForm($form, $form_state);
  }

  /**
   * {@inheritdoc}
   */
  public function submitForm(array &$form, FormStateInterface $form_state) {
    // Display result.
    foreach ($form_state->getValues() as $key => $value) {
      \Drupal::messenger()->addMessage($key . ': ' . ($key === 'text_format'?$value['value']:$value));
    }
  }

}
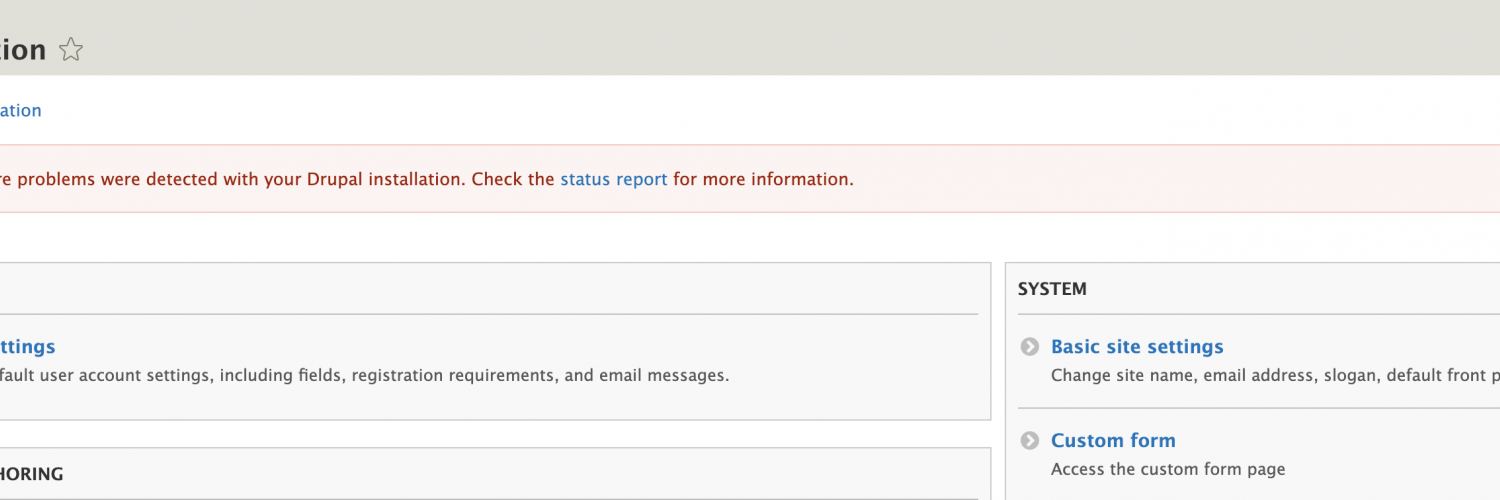
Menu Links
Just like our tutorial when we created a custom page, we can also add menu links to our custom form, using the yaml code like below in our [module name].links.menu.yml, we can add a menu link to our custom form to the main admin menu toolbar.
custom_form.custom_form_menu_link:
  title: 'Custom form'
  route_name: custom_form.custom_form
  description: 'Access the custom form page'
  parent: system.admin
  weight: 1

With the below menu link yaml config code, we can add a menu link to our custom form to the page admin menu list page.
custom_form.admin:
  title: 'Custom form'
  description: 'Access the custom form page'
  parent: system.admin_config_system
  route_name: custom_form.custom_form
Routing
For the form to the be accessible via a url and for our menu items to work, we need to setup a route by adding yaml code that looks a bit like the below to the [module name].routing.yml, this sets up our url that the form should show and when the url is called, the code under the hood of Drupal will go and grab the form from the namespace set in the menu link configuration.
The below yaml configuration, will allow the custom form to be shown in the admin part of the website, which adds a layer of security and this security can be increased, by further restricting which admin user roles (depending on the user roles/ permissions structure you have defined). The example below is using the custom permission that we created in this blog post.
custom_form.custom_form:
  path: '/admin/custom-form'
  defaults:
    _form: '\Drupal\custom_form\Form\CustomForm'
    _title: 'Custom Form'
  requirements:
    _permission: 'access custom form'
The below routing yml configuration will setup a route that enables the user to access the form on a page on the front end of the site, which has a little less restriction, unless you add in restrictions to the route, mentioned above. For this route, as we want the url to be accessible by all, the permission section of the yaml config is set as such, so that all users can access the route whether logged in or not.
custom_form.custom_form:
  path: '/custom-form'
  defaults:
    _form: '\Drupal\custom_form\Form\CustomForm'
    _title: 'Custom Form'
  requirements:
    _access: 'TRUE'
Output the form in a custom block
We can also output our custom form or any other form for that matter in a custom block. There are two ways that we can do with, but first we need to create a block in the src/Plugin/Block directory of our module, create a php file called CustomFormBlock.php and we will use Drupal's form builder functionality to grab our custom form and output.
We can interface with the form builder by using dependency injection or not. I'll try and cover dependency injection in another blog post, it is concept that can for some people take a bit of time to understand.
So without dependency injection we can add the following code to our CustomFormBlock.php file, this will grab the custom form from its' namespace and output.
<?php

namespace Drupal\custom_form\Plugin\Block;

use Drupal\Core\Block\BlockBase;

/**
 * Provides a 'CustomFormBlock' block.
 *
 * @Block(
 *  id = "custom_form_block",
 *  admin_label = @Translation("Custom form block"),
 * )
 */
class CustomFormBlock extends BlockBase {

  /**
   * {@inheritdoc}
   */
  public function build() {
    $form = \Drupal::formBuilder()->getForm('Drupal\custom_form\Form\CustomForm');

    return $form;
  }

}
Building upon the above, we can also dependency injection using the below code.
<?php
namespace Drupal\custom_form\Plugin\Block;
use Drupal\Core\Block\BlockBase;
use Drupal\Core\Form\FormBuilderInterface;
use Drupal\Core\Plugin\ContainerFactoryPluginInterface;
use Symfony\Component\DependencyInjection\ContainerInterface;
/**
* Provides a 'CustomFormBlock' block.
*
* @Block(
* id = "custom_form_block",
* admin_label = @Translation("Custom form block"),
* )
*/
class CustomFormBlock extends BlockBase implements ContainerFactoryPluginInterface {
/**
* @var FormBuilderInterface
*/
protected $formBuilder;
/**
* CustomFormBlock constructor.
* @param array $configuration
* @param $plugin_id
* @param $plugin_definition
* @param FormBuilderInterface $form_builder
*/
public function __construct(
array $configuration,
$plugin_id,
$plugin_definition,
FormBuilderInterface $form_builder)
{
parent::__construct($configuration, $plugin_id, $plugin_definition);
$this->formBuilder = $form_builder;
}
/**
* @param ContainerInterface $container
* @param array $configuration
* @param string $plugin_id
* @param mixed $plugin_definition
* @return ContainerFactoryPluginInterface|static
*/
public static function create(
ContainerInterface $container,
array $configuration,
$plugin_id,
$plugin_definition)
{
return new static(
$configuration,
$plugin_id,
$plugin_definition,
$container->get('form_builder')
);
}
/**
* @return array
*/
public function build() {
$form = $this->formBuilder->getForm('Drupal\custom_form\Form\CustomForm');
return $form;
}
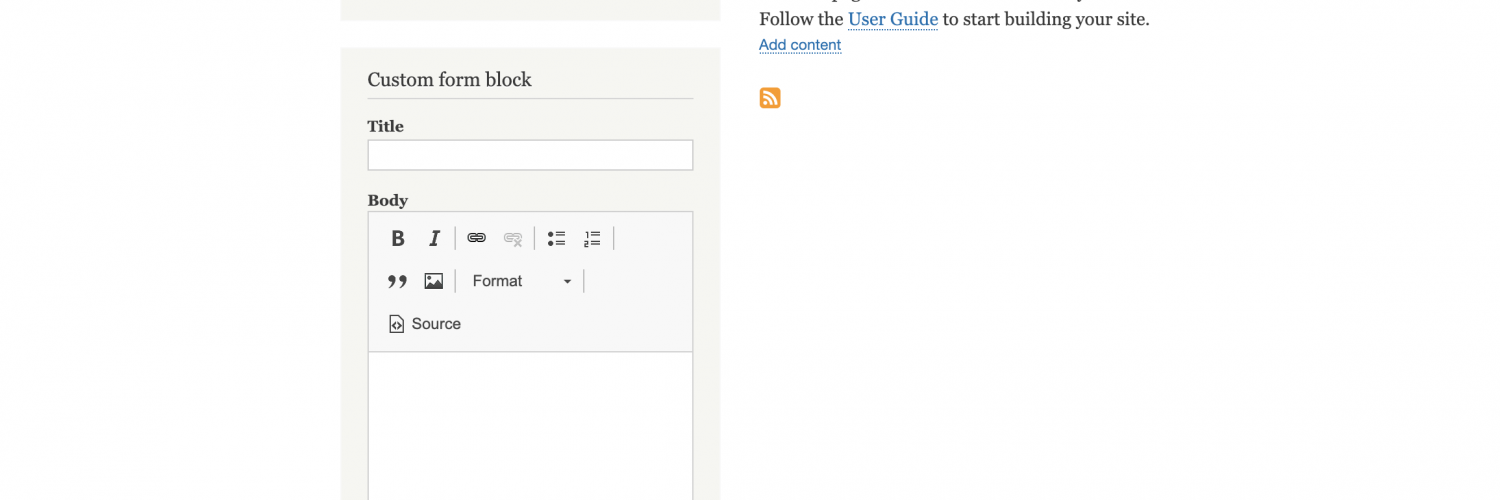
}You should now be able to add your custom block to the page/ region that you want and you should see your custom form showing in your custom block.
Drupal Console
As mentioned in our other blog posts, we can use drupal console to help speed up creating some of the code in our module. The commands that can be used create to speed up the creation of parts of the module created throughout this blog post are;
Generate module
drupal gmGenerate form
drupal gfGenerate permissions
drupal gpGenerate block
drupal gpb